How to make a beehive for bees with your own hands
Once you have decided to become a beekeeper and bought a couple of families, it's time for new hives. Families grow and swarm, and they need to be planted in new houses. You can, of course, buy ready-made ones, but buying used ones is dangerous. It is not known what diseases you can buy with them, but the new prices bite. One thing remains - to make beehives for bees with your own hands according to the drawings. If you know all the manufacturing rules, then it is not difficult at all.
In this article, we will just talk about making hives with our own hands, the correct sizes and drawings for them. We learn what a hive lounger is and how to make it.
In ancient times, beekeepers extracted honey in the hollows of trees, then they began to hollow out logs for bees. With the development of beekeeping, they began to make evidence for bees with their own hands of various designs, and the material used for them is different.
Tree
The classic option for making hives for bees. In such houses, the bees feel in natural conditions, close to natural. The best type of wood for making will be cedar, although linden and aspen are also possible. These hives breathe better, smell good and are dry.
Aspen and linden hives require additional insulation in winter. And these are expensive materials.
Some beekeepers are engaged in making hives with their own hands from cheaper materials. This is pine, spruce, fir. But in such evidence, the bees are not comfortable. They collect moisture and resins, especially in new ones.. Pine smell. There is only one good thing about them, they are warm and require minimal insulation for the winter.
Plywood
Durable and environmental material. A house made of it must be covered with paints and insulated from the inside with polystyrene foam, then it will be dry and warm in it. But plywood is afraid of moisture and requires constant and proper care.
Styrofoam
A modern material used by beekeepers to make hives. It has a low cost and does not require additional insulation in the winter.
The disadvantage of this material is fragility and brittleness. If poor quality is chosen, then the deterioration of honey is possible.
Styrofoam
The most economical option. It is possible to use packaging from household appliances. The advantage of this material is its lightness even with filled frames. Excellent thermal insulation. The downside of this material is its fragility and permanent coloration, so that it does not crumble from exposure to sunlight.
Polyurethane
Excellent thermal insulation properties. Does not rot, does not decompose. It does not develop fungus and bacteria. It does not allow moisture to pass through and it does not accumulate inside. Bees, mice and birds do not like to gnaw it.
A slight disadvantage is its combustibility and ventilation is required, because it does not allow air to pass through.
Having carefully studied the characteristics of the material, you can begin to build a hive. Consider options for the construction of wooden and foam houses.
Types and designs of hives
Houses for bees are divided by design:
- collapsible;
- non-separable.
Almost no one uses the latter because of the complexity of care.. All beekeepers use frame hives, where the number of frames can vary. A do-it-yourself beehive sunbed for 24 frames is popular. However, there are options for 16 and 20 frames.
In turn, frame hives are divided into:
- horizontal;
- vertical.
Horizontal or "bed" consists of one body. The expansion goes to the sides. It is easy to work with such evidence, change the number of frames, but they have a drawback - they are bulky and heavy.
Vertical ones consist of several buildings. This form is lightweight and portable.
Both forms use multiple sections. They are separated by partitions, which allows you to change the volume in any direction.
Popular Designs
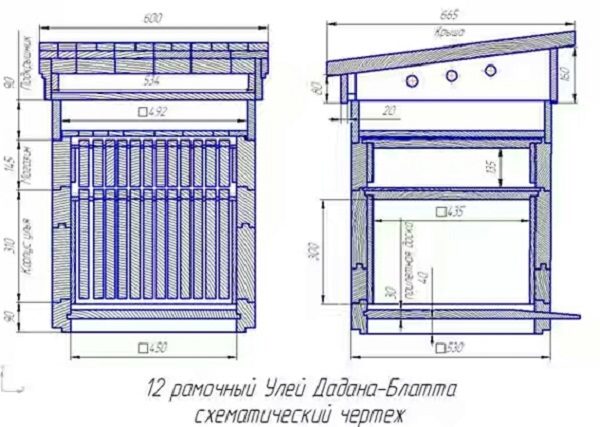
Dadanovsky
It is used in almost all apiaries. It is made of wood (cedar, spruce, pine, linden, aspen). Differs in simplicity and spaciousness. Consists of 12 frames and can be supplemented, as the family grows, with shops or buildings. In winter, bees are kept in the nest box. With the onset of heat and an increase in the family, they are placed in corps.
Alpine
Multihull hive. Created by French beekeeper Roger Delon. Made according to the principle of a hollow. That is, the natural living conditions of bees have been created and taken into account.
Compact design is convenient for limited spaces. It has no partitions and ventilation holes. Air naturally enters through the notch.
Ruta
This do-it-yourself bee house designed for keeping bees in the southern regions, because due to the constant rearrangements of the buildings, hypothermia of the house occurs. Consists of 6 cases on 10 frames.
Cassette
In connection with the increase in the incidence of bees among beekeepers, cluster hives have become popular. Such evidence have thin partitions, so the bees create their own microclimate.
It is made only from wood and impregnated with wax, so the bees in them are less susceptible to diseases.
Ukrainian lounger
This design of the hive in size is the most suitable for beginners. They are easy to service. Easy to build, which will allow you to master the skills of beekeeping. Usually such a hive for 20 frames. The sides of the house are insulated, so the bees winter well in them.
There are many designs of evidence, but let's dwell in more detail on the classic, sunbed with a different number of frames and a multi-hull bezelless. In this case, there are bee hives for 16, 20 and 24 frames.
How to build a classic hive step by step
Due to the ease of manufacture, the Dadanovsky hive is considered a classic option.
For the manufacture of hives, it is better to use natural materials.
The classic design for the production of hives consists of:
- One or more buildings.
- One or two shops.
- Roof lining.
- The bottom of the hive.
- Ceiling.
- Roofs.
- Framework.
- Feeders.
- Insert board.
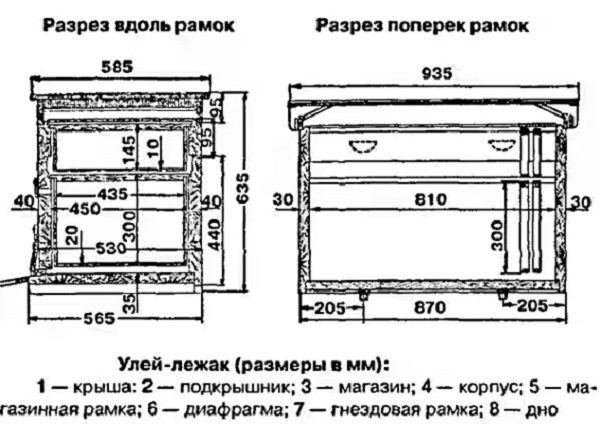
Instructions for a house for bees with drawings
And now let's talk about how to make a beehive with your own hands step by step. The size of the hive for bees can be very different, but we will focus on one option. For this you will need:
The lid and liner require a board 15 mm thick. Collect and cover with tin so that water does not get in. Paint. Make ventilation holes with a diameter of 1.4 cm.
- back and front shield (cm): width 53, height 32, thickness 4.
- side shield (cm): width 48, height 32, thickness 4.
- inner (cm): width 45, height 45, thickness 32.
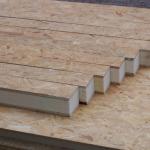
In order to place the frames in the case, it is required to make folds.
Dimensions 1.1 * 2 cm.
If there is a multi-hull bee hive, then the dimensions will be different: 1 * 1.4 cm.

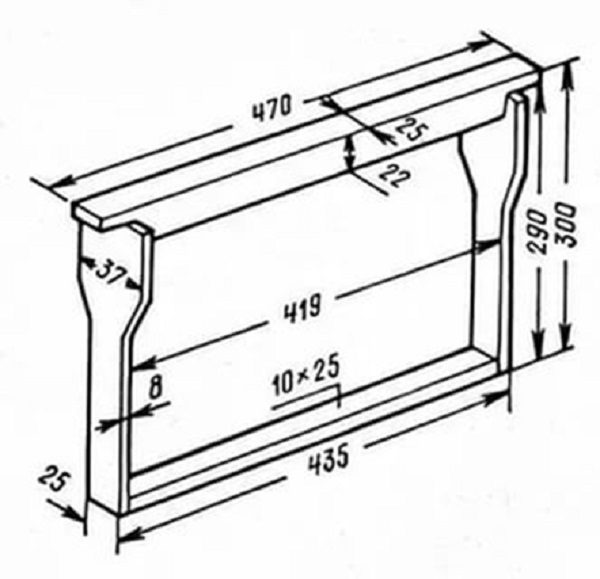
Frame located in the nest - 43.5 * 30 cm;
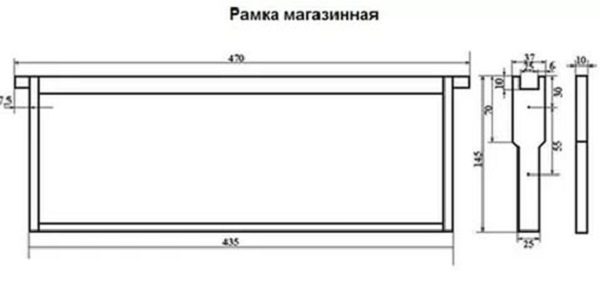
Store frame - 43.5 * 14.5 cm;
The distance from the walls of the case to the side rails is 0.07 cm;
Space under the frame - 2.5 cm;
Frame side width - 3.7 cm.
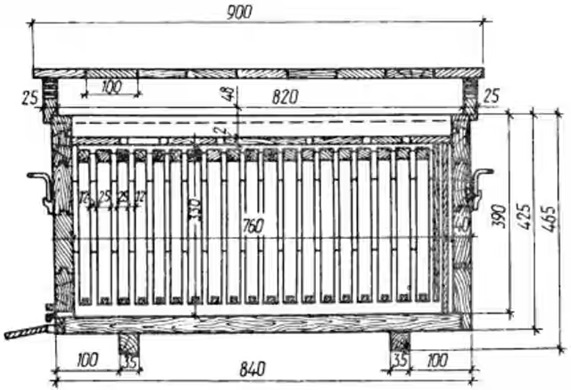
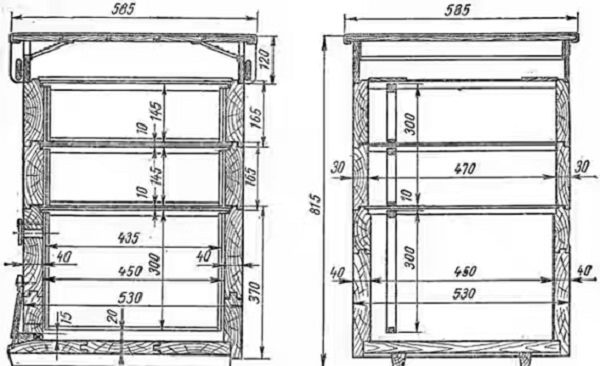
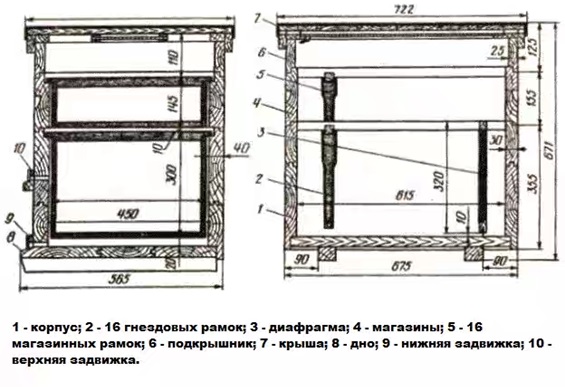
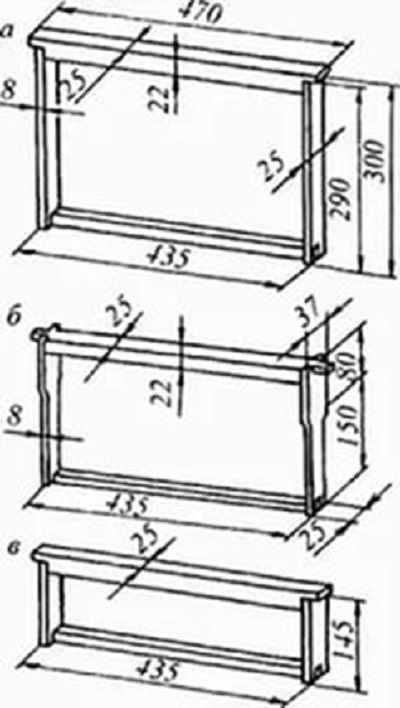
Hive-lounger for 16, 20 and 24 frames: drawings and dimensions
 Hive-lounger for 16, 20 and 24 frames
 What tools and material will be needed?
- Wood, plywood, foam.
- Rulers, or roulettes.
- Squares;
- Hacksaws.
- Hammers.
- Drill, drill, screws.
- Chisels.
- Glue.
- Carrying handles.
- Galvanized sheet for the roof.
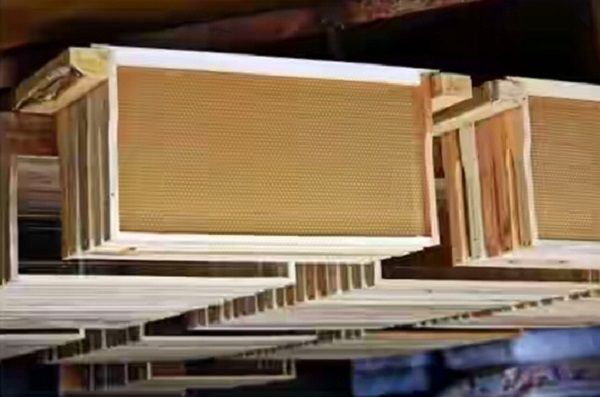
- Frames in the amount of 24 pieces.
Hive dimensions:
- frames 30 * 43.5 cm;
- body (cm): length 87, width 56.5, height 63.5;
- roof length (cm): outside 93.5, inside 81;
- bottom thickness 3.5 cm;
- lower notch - 1.2 * 14 cm;
- upper notch - diameter 2.5 cm.
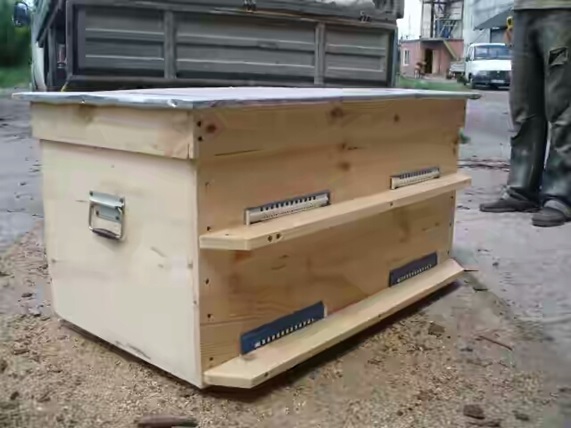
Instructions for making a hive for 24 frames
- From the prepared material, cut out the details according to the drawings.
Accurately observe the dimensions so that the construction of the evidence for bees with your own hands is even and without large gaps.
 Instructions for making a beehive lounger
 - Collect the bottom. Connect the two slats and the flooring with soil and nails.
- Connect the side walls and attach to the bottom. Make a ledge for the bars 2 cm.
- On the front and back walls, make grooves for the frames. Size 1.8 * 1.1 cm.
- Cut through the holes from the bottom.
- Attach a valve and a landing board.
- Make a roof. Fasten the boards with spike nails.
- Attach hinges to the roof for opening.
- Cover the roof with tin.
- On the back side of the roof, make a ventilation hole 20 * 0.03 cm.
- On the front wall drill a hole with a diameter of 2.5 cm.
- Cover them with netting.
- To the bottom of strong legs.
- Proliferate and paint.
- Attach handles for easy portability.
Should be painted white. This color is remembered better by bees. White color repels the sun's rays.
How to make evidence bed for 20 and 16 frames
It is made according to the same principle with a difference in size.
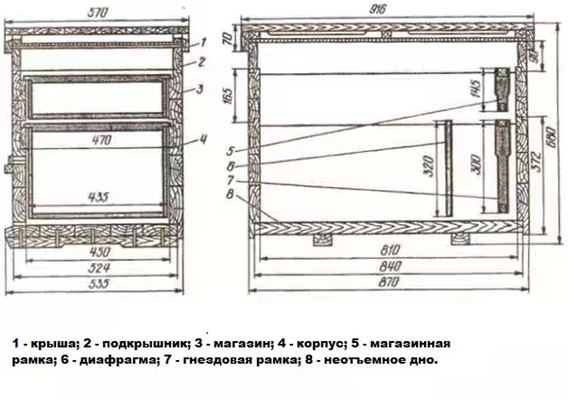
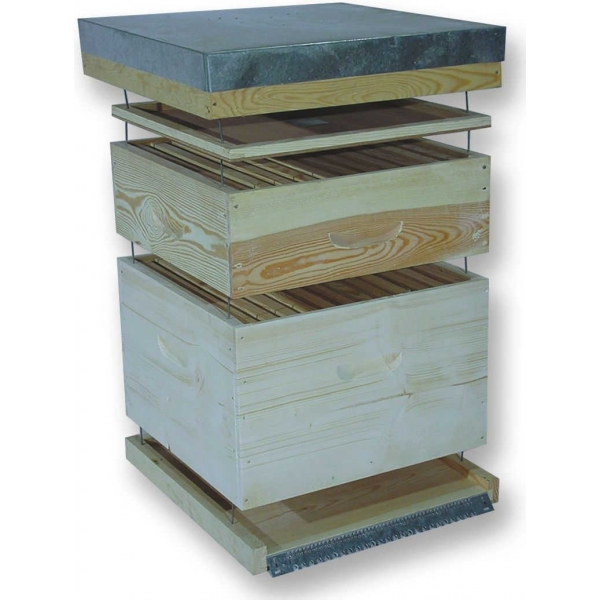
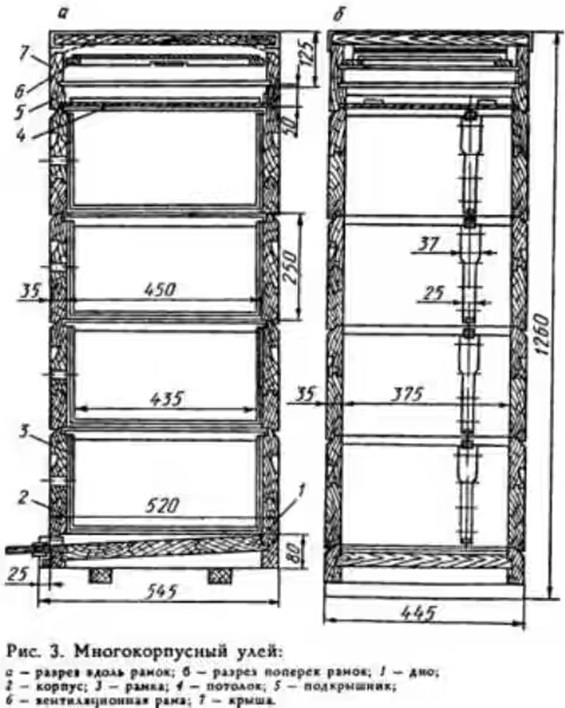
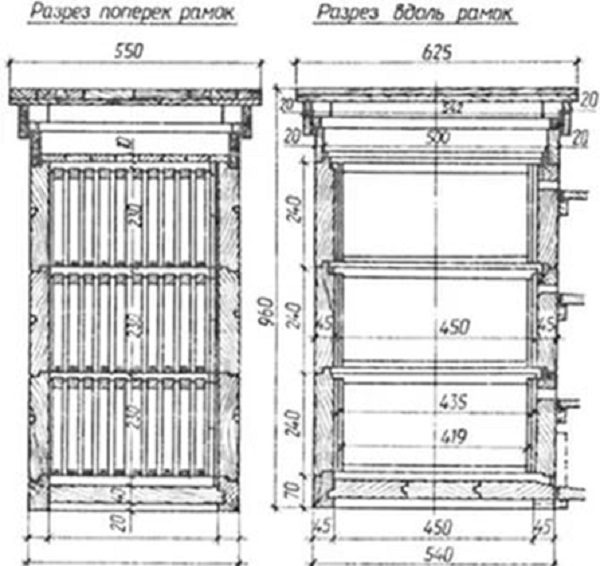
Multi-hull bessaltsevy beehive: dimensions and drawings.

Over the years, this hive has not lost its popularity in use. The convenient design allows them to be used everywhere. And yes, it is easy to make.
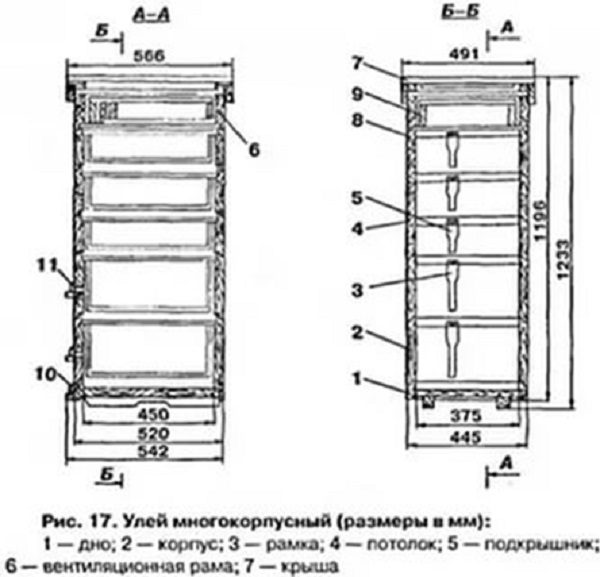
In order to properly build a hive, you need to know what the structure consists of:
- Lid.
- Roof or ceiling.
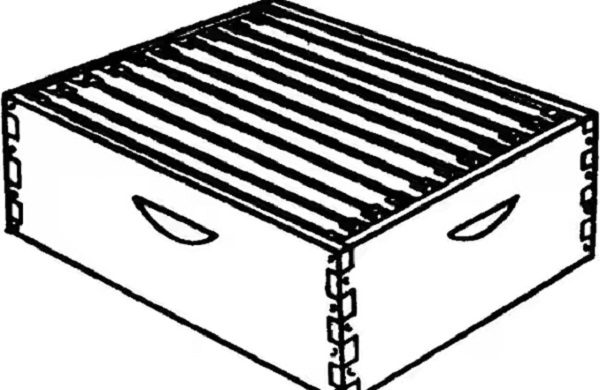
- The shops.
- Corps.
- Stand.
- Framework.
- Dividing grid.
The box looks like a box. Its inside size (cm): 37.5 wide; length 45; height 24.
It includes 10 - 12 frames measuring 43.5 * 23 cm.
Such sizes are more suitable for regions with a warm climate, and for the Russian climate, the width is made half a centimeter larger.
Reducing the size leads to inconvenience in working with frames. They are impossible to get when they are heavily propolised or swollen from moisture. Therefore, some increase the width of the case to 38 cm.
For the manufacture of cases, you need to take carefully dried boards. They should dry out within a year. When cutting out parts, the boards should be with a small margin (3-5 mm). The stock is left for further fitting parts. For trimming, it is recommended to leave an overlap of 1 cm.
On the front and back parts of the case, make folds to put frames on them. Size 1.1 and 1.7 cm. This depth allows you to freely place the upper case.
On the side walls you need to attach handles or small recesses.
A hole of 25 mm is drilled from the end of the hive under the roof for ventilation of the house.
Boxes with frames are tightly connected to each other. In this case, folds are not used. Such a constructive solution is more convenient in operation and simple in construction.
In cases with the use of folds, during transportation or movement, the bees most often clog in the lower part and hide in the folded recesses, subsequently dying. Most often, the uterus dies in them and beekeepers abandoned such hives in favor of a non-folded design.
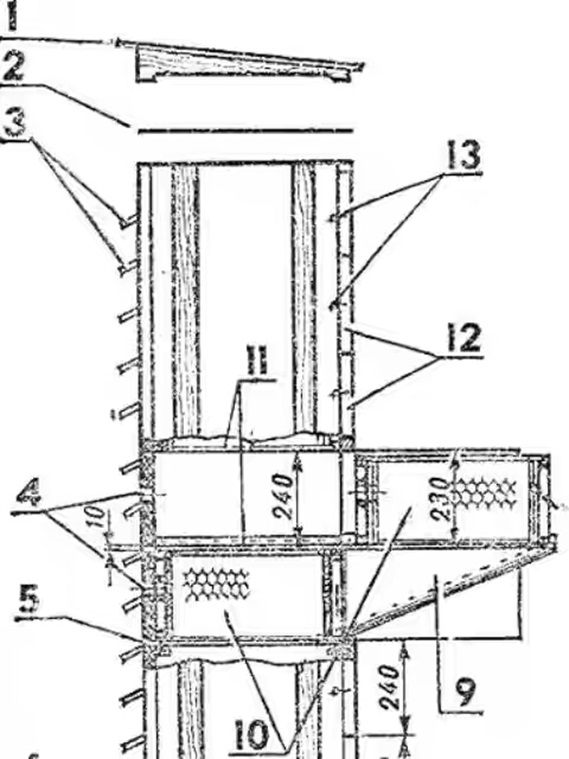
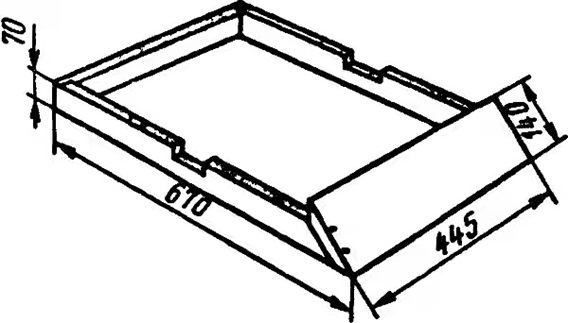
A plate 2 cm thick is taken for the manufacture of the roof. A shield is knocked out of it, which is covered with galvanized tin.
The bottom is better to make removable, double-sided.
- three bars 57 * 6.5 * 3.5 cm - side;
- one 44.5*6.5*3. cm installed at the back.
Make grooves in them. Width 3.5 and depth 1 cm. Assemble a p-shaped structure. The grooves are designed to install a floor plate.

It is necessary to provide a protrusion of the front by 50 mm. It serves as a landing board.
Roof lining (ceiling) - a solid shield assembled from dies, 52 * 44 cm in size. Around it is a rim made of rails. Their width is 3.5 cm and thickness is 1.5 cm. A hole is made in the center. It is necessary for ventilation between the buildings or a feeder is placed on it.
The liner is placed on the body with a smooth side without a rim which allows the bees to move freely. It can also serve as a dividing grid, in which case a mesh is stuffed onto the hole.
Stand. It is made from bars according to the size of the bottom. A wide die is nailed in the front part at an angle of 45 °. This will be the landing board.
A recess 2.5 * 9 cm in size is cut out in the side bars. They are designed for convenience when you need to raise the hive or secure it when moving.
To increase the life of the bars, impregnate them with liquid bitumen. Dissolve it with gasoline. This procedure will make the tree waterproof.
Dividing grid dimensions. Designed to isolate the temporary isolation of the uterus. To separate the body with brood from honey.
The size of the grille must match the size of the inner case. She is put on bars. Made from wire mesh.
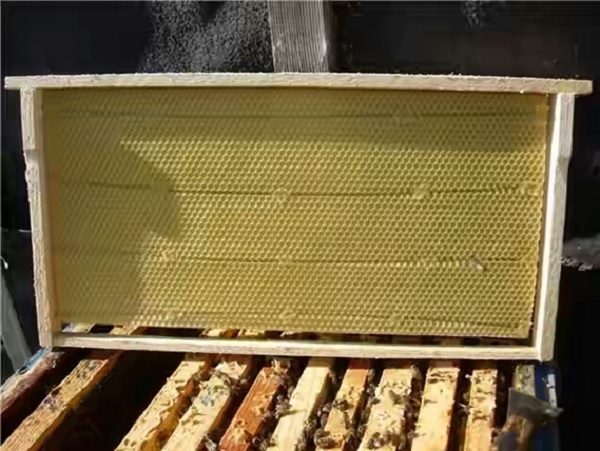
Frame sizes. Case and store frames, you can also do it yourself. They must match the drawings.
Drawings of multi-hull hives.
Frames in the hive: dimensions and description of how to do it yourself
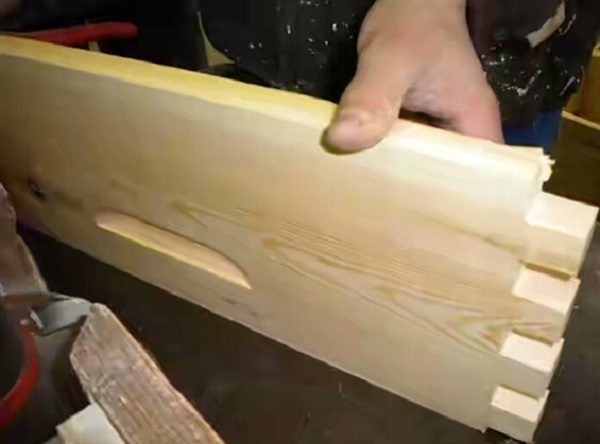
Frames are an important part in hives and most of the work is done with them. From constant use, they become unusable and need to be added. Therefore, the beekeeper should always have a large supply. To save money, it is better to make them yourself than to constantly buy them.
For the manufacture of frames, we will use the following tools:
- hammer;
- pliers;
- awl;
- shoe nails;
- coil of thin wire.
For manufacturing, use natural materials. It is better if these are boards dried during the year. To make a frame, you need to know what parts it consists of:
Upper bar.
Grooved or uniform.
Bottom bar.
Plain, grooved or with a through cut.
Side bars.
They have holes for pulling the wire under the foundation.
The dimensions of the frames depend on the design of your hive. The standard sizes are:
- the width of the top and side boards is 2.5 cm;
- the height of the upper bar is 2 cm;
- bottom width 1.5 - 2.5 cm;
- height 1 cm;
- external dimensions vary depending on the design of the hive, but usually 43.5 * 30 cm.
After we have chosen the material and decided on the dimensions, we proceed to the direct manufacture of the frame.
- From dry boards, cut out the details according to the dimensions of the drawing.
- Using shoe nails, connect all the details.
- Drill 4 holes on the side rails and two double holes for attaching the wire. The distances between the holes must be equal.
- Stretch the wire. Start at the top hole and snake through it. Make sure that the wire does not cross anywhere. Fasten it securely so that heavy honeycombs do not accidentally break. You should end up with 4 lines.
Foundation is fixed on the frames prepared in this way.
Now you know how to make do-it-yourself beehives for bees with drawings. Using the drawings and dimensions, you can easily build it yourself, thereby saving the budget and providing the bees with comfortable living conditions.